 The following is a short step-by-step of a painting from this photo. It was loaned to me by fellow artist Jana Bouc, http://janabouc.wordpress.com/ and I wanted to see what I could do with it. I know right away that I want to move the position of the drapery, not having it right in the middle of the composition, and I'll also crop in the photo, so the flowers and vase fill up the canvas more. I take some scrap paper and cover parts of two sides, so that I won't see the far edges. I love all the drama in this photo and am eager to get painting.
Friday, September 21, 2007
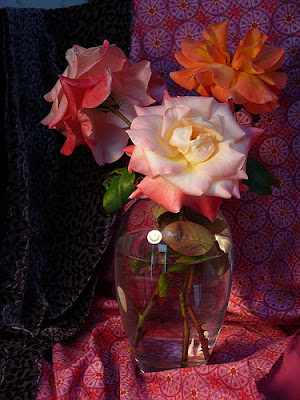
Jana's Rose Photo and Short Step Process
The following is a short step-by-step of a painting from this photo. It was loaned to me by fellow artist Jana Bouc, http://janabouc.wordpress.com/ and I wanted to see what I could do with it. I know right away that I want to move the position of the drapery, not having it right in the middle of the composition, and I'll also crop in the photo, so the flowers and vase fill up the canvas more. I take some scrap paper and cover parts of two sides, so that I won't see the far edges. I love all the drama in this photo and am eager to get painting.Sketching the Composition
 I want my vase and flowers to fill up the canvas, so I've cropped the photo by covering part of two sides with scrap paper, and then sketching in thin paint with a lot of OMS. As I correct the "drawing" and wipe off mistakes with a paper towel dipped in OMS, I'm also toning the canvas very thinly with a sienna coating. I already know that to try to make this a tight painting, it will take more time, so I'm going to do this loose and kind of "sketchy," a style I really like to work in. I'm only indicating major lines here, and getting the shapes down quickly.
Step Two Indicate Darks
 I like the drawing now, after "erasing" it with paper towel several times, and changing this area and that. I start by putting in the darks, always the most fragile colors. I'm using alizarin, burnt carmine and some purple madder, keeping these darks very rich.
Drapery Step 3
 Mostly working with darks, deep reds and purples, I paint in the background and the drapery. I like the pattern in the right hand drape, but treat it as dots rather than the more complicated pattern that it is. A couple of quick strokes for the leaves.
Foreground Flower
 I'm satisfied with the background, and have started on the flowers. I like the shape on this one, and have tried to keep it very simple. I am really not trying to make the rose look like the photo, just get a pleasing suggestion of colors and shapes.
Front Flower Detail
 Detail of the front flower, included so that you can see the brush work. I've mostly not blended here, just laid in the colors where they needed to go.
Back Two Flowers
 Working on the two back flowers, the orange one giving me some trouble. It looks too choppy, and doesn't make sense. I go back and forth between the two flowers, trying not to get too
 much mush. The paint is pretty thick, so anything as overlay has to be thick, and carefully applied. The other alternative is to scrape and start again, which is also a perfectly good solution.
Finished Painting
 The finished painting is 10" x 12", oil on Canvas board. Here I've added the edges of the water inside the vase, just a few strokes to suggest, and the highlights on the glass. I finished the last flower and cut back into the edges with the burnt carmine.
Subscribe to:
Posts (Atom)
