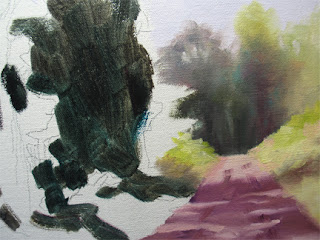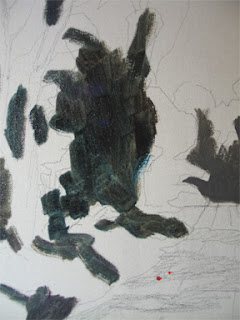
Starting a new painting. More acurately, two of the same painting. The following entries are some of the steps I made in the process. It was pretty easy to shoot a photo when I was swapping out the two paintings, using the same colors for each step on the two paintings. This is done with the limited palette I've been using lately from the book, The Yin/Yang of Painting, by Hongian Zhang, who gives three complementary palettes. Of these three: the blue-orange, the purple-yellow, and the red-green, I'm using the red-green palette colors. I'm not really missing the blues and the yellows much any more, since I have turquoise and citron to use.
I sketch out in pencil the basic shapes in the painting. Over this I spray workable fixative. Usually you would tone the canvas once the fixative is dry, but here I just didn't. I block in my darks, and then start carefully mixing my critical colors: the road colors. I paint of bit of my test color on a piece of scrap paper, and hold it right up to the photo. Then I talk to myself, warmer, lighter, more pink, more orange, more purple...til I get it right. The actual colors in the foliage don't matter quite so much, so long as you get the basic values right, but with the road and it's shadows, I want to come as close as I can.
I hope that you enjoy the following posts. The two finished paintings are posted today on my painting blog, Nel's Everyday Painting. The link is listed in the sidebar. Thanks for looking.
Wednesday, August 22, 2007
Step Two
Step Three
I paint in the darker areas of the road shadow. You could do the road one of two ways, either consider the road as dark and paint the light spots over top of the dark edges of the spaces, or consider the road as light, and paint the light spot first, and the darker shapes to overlap on top of the lights. Either way, the effort is to keep the two colors pure right now, and not intermix them too much, which would lose both the power of the dark and the punch of the light.
Step Three
I mix a very light sky color, starting with white and then adding teeny bits of magenta and blue, and I mean tiny bits. You want the sky to be (most of the time) your lightest area, and it's surprising how light it can be, how little color you need to make it work. I don't touch the other colors with my sky color yet.
Step Four
Blocking in the background grey and the light lavender of the sky. I paint almost up to the tree edges, but don't want to pick up any extra color into my sky color. I've also put in the second road color here, and some darker lines for the ruts in the road. These rut lines will help break up the horizontal shadow shapes and give more of a suggestion of road. There is still a bit of blending to do, since you want the road to "lay down" flat as one unit. Flattening the texture and easing the edges will help. I won't do too much blending right here, since the addition of the middle ground colors will detract from all this action.
Step Five
Road light colors and starting to blend them together. Also here I am doing some finish work on the background greyed area. I want it dark, but also light enough and "blued" enough to show distance. I also want to suggest a warm light back there on the tree tops with some citron color. Theres a lot of blending and then repainting, working it back and forth.
Step Six
Now the lighter edges of the road side. These are a mixture of white and citron yellow and some cinnabar green light (one of my favorites). I use a little of the road color for the continued shadow from the road into the grasses. Now I can also judge and refine the depth and value of the greyed area of the background. It's pretty close, but I can see where a little more darkness underneath the tree tops back there would help.
Step Seven
Step Eight
I cover the remainder of the white canvas now with thin mixes of mostly burnt sienna (the orange you see here is b.s. thinned up) keeping the coverage even thinner where I'll have lighter colors over top. The burnt sienna sometimes shows through the green foliage and makes a nice complement. This coat can dry quickly and then I can paint the mid ground.
Step Nine
The greyed background, the road edges and the road are all pretty much done. I'm working my finishing from the background forward here. I finish up the trees (birches) on the left side of the road top. I work from the edge towards the left side, blending from the dark into the light. Then I'll do finishing work on the middle ground and the foreground.
Step Ten
Using a rigger brush, I put in the treetops of the birches, then daub some of the road color into the lines, just lightly. This is done right on the dry canvas (actually it should have been toned first, but...) Over the sky the lines would have lost their thin darkness. This way I can go back in and paint the sky holes right up to the colors and lines.
Step Eleven
Refining the Middle Ground. Adding swashes of green overtop what's already there. Some turquoise to cool the middle ground but give it some shapes. Further definition of the greens in the foreground. What I've found with oils is that you can plan on the layers. You know that you'll have a leaf clump in a certain spot. You can first put a mid or a dark down thin for the lighter leaf clump to sit on top of.
Finishing Touches
Wednesday, August 08, 2007
New Painting
This painting has posted in it's finished form on my Nel's Everyday Painting blog, but I took some progression shots of it as I was painting. This is not actually the beginning. I've painted in the drawing pretty loosely, and started with the arms. Pencil work for the lines, where they need to be straight. Originally I had her glasses on, but left them out for the rest of the painting (by Alex my granddaughter's request.) There are some drawing problems which will be addressed: the tilt of the ear, the length of the forward leg, the height of the back shoulder. The size is 18" x 18", done of my granddaughter. Photos taken on the front porch yesterday morning, while she was having her cereal. Progression photos follow. Thanks for looking.
Working the Figure. Back and forth, pajamas and shirt. You can see a late stage drawing correction in the closest leg. It wasn't long enough, so when I turned the painting and the photo upside down, I could see where the new line should be. I've started painting in all the lines in the background. Basically working from the figure outwards.
Final Steps
Saturday, August 04, 2007
Watercolors in Tandem
Two watercolors at a time. Seems to me that it's the way to go. Even then, you spend more time waiting for the paper to dry than you do painting. (Or at least I do.) The sunset is from our stay at Harbor Island, South Carolina, where I took some really nice photos. It may wind up on the selling blog tomorrow, but I actually did it for myself and for a friend whom I'm online-mentoring in watercolors. It's 12" x 18", and the little hydrangea my grandson picked for me to paint, so I did. It has that mauvy, sienna pinkish yellowish greenish color to it. YOU know the color I mean, LOL. It's a small 7" x 9", and it could be sold as well, for a tiny corner somewhere. Thanks for looking.
Subscribe to:
Posts (Atom)